 Finally the snow has melted and spring is in the air! The staff at the farm has been working hard, and I have the pictures to show their efforts. This is just one of the many hoop houses.
 I have returned for another season as Staff Chef, cooking for the crew of
JenEhr farm on Mondays and Fridays. This is quite a fun job that I have. I show up at the farm and rummage through the "pack shed" for what has recently been harvested. Sometimes with knife in hand, I trek out to a hoop house. And, occasionally one of the eager staff "mates" will bring me in something he/she has just picked, either on his/her own or as a request from me. I then prepare lunch for the staff, which includes dessert. Sometimes I come armed with ideas/recipes and sometimes I just "wing it". I am lucky, the staff is always famished from working since early morning and will eat just about anything, and everything that I prepare. They are such "sports" for trying all my experiments.

I am so excited to be back. And, I was so excited to actually find produce in the pack shed. Yes, lots of produce. Lucky me!!! The produce that Megan brought into me, that was just harvested, consisted of sorrel, greens from the
napa family, green garlic (pictured right), and French breakfast radishes. Onions, garlic, cabbage and rutabaga awaited me in the hoop house. Here in Wisconsin one has to rely on proper cold storage to save things from the fall season.
I will post the menu and recipes for what I prepared for the day. I am cooking for a "crowed", but, I will adjust and post the recipes to feed 4. If it is more or less I will state that at the end of each recipe.
There are a few things that I am highlighting today:
1. Sugar River Dairy Yogurt - Sugar River Dairy is a family-owned and operated farm in Albany, WI that produces yogurt from cows that are pasture-grazed and rBGH-free. You can pick it up around town at many locations or farmer's markets. I can't find a website for them at the moment - but when I do I will post it for all to see.
 2. Frozen tomatoes - What? That is what I said the first time I was told "we have frozen tomatoes in the freezer that you can use." But, it is a great way to preserve fresh tomatoes in the summer. Just freeze them whole. Then when you use them, just run them under water and the skins peel off magically. They are great for braises because they break down beautifully, and what flavor.
3. JenEhr Farm - I can not forget this fabulous farm. This is where I prepare these meals on Mondays and Fridays. For all information regarding the farm check out the website http://www.wisconsingrown.com/. This website will explain it all.
4. JenEhr chickens - these fellas are pasture- raised. They eat stuff on/in the ground, as well as their custom made feed (that does not contain GMOs or animal byproducts). They get to bask in the sun. They get to walk around. They get to socialize on their own terms, not because they are forced to share a "cell" with others. Oh, and they get a different view of the farm everyday, since their cages are moved daily. The texture or the meat is firm and the flavor is amazing. The bonus, the stock that I make from these "guys" is incredible - very gelatinous. I always save my bones, I usually have a bag-of-bones in the freezer that I add to, waiting for when I have an afternoon to read and make stock.
Today's Menu
Chilled Spring-Greens Soup
Tossed Salad with Curry Sorrel Poppy Seed Vinaigrette
Roasted Cabbage
Tomato/Onion/Garlic Braised Chicken with White Beans and Green Garlic
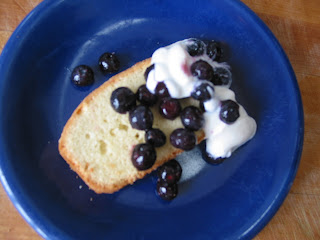
Pound Cake Topped with Blueberries and Sugar River Dairy Vanilla Yogurt
Chilled Spring-Greens Soup adapted from Seasonal Food by Susannah Blake3 medium potatoes, peeled and cut into 1/2 inch pieces
4 cups vegetable stock
3 large handfuls spinach, roughly chopped
1 large handful arugula, roughly chopped
2 large handfuls sorrel, roughly chopped
1/2 cup white wine
1/2 cup heavy cream
salt and ground pepper black pepper to taste
Place the potatoes and stock in a large pot, bring to a boil, then reduce the heat, and simmer for about 10 minutes until the potatoes are tender.Add the spinach, arugula, sorrel, simmer covered for about 2 minutes until the greens are wilted.
In batches, pour the soup into a blender and blend until smooth. DO NOT fill the blender more that half full, remove the small stopper in the lid and cover the top/lid with a towel, put your hand on the towel. Start with a low speed and work your way up slowly to the fasted speed. (Hot soup expands when you blend it and if you do not follow these tips hot soup might spray all over your kitchen). Pour soup into a large bowl. Stir in wine and cream. Season to taste with salt and pepper. Let cool, and then place in the refrigerator to chill for at least 2 hours before serving.
Tossed Salad with Curry Sorrel Poppy Seed VinaigretteFrench breakfast radishes - washed and sliced
greens - washed and dried
tops from green garlic - sliced thinly
Vinaigrette:
6 sorrel leaves
1/4 cup cider vinegar
1 t. honey
2 T. poppy seeds
1 t. curry powder
dash of salt
3/4 cup of canola oil
In a blender, blend the first 6 ingredients. Take the stopper out of the blender top. Slowly drizzle the oil in the blender while it is running. Taste, if it is too tart drizzle in more oil. Set aside.
Roasted Cabbage1/2 large cabbage, or 1 small cabbage, thinly sliced
salt and pepper
Preheat oven to 375 degrees. Arrange cabbage in a oven safe casserole dish. Cover cabbage with 1/3 cup water. Season with salt and pepper. Roast for 30 -40 minutes, stirring occasionally. Test if done poking with a knife.
 Tomato, Onion, GarlicBraised Chicken with White Beans and Green Garlic
1 whole JenEhr chicken, cut in 8 pieces
1/4 cup flour
1/3 cup canola oil
2 garlic cloves, finely chopped
1 large onion, thinly sliced
1/2 cup white wine
12 whole frozen tomatoes (or 12 tomatoes, skinned or 1 large can of whole tomatoes)
1 bay leaf
2 t. dried oregano
1/2 bag of dried white beans, cooked thoroughly (or 1 can of white beans, drained and rinsed)
1 green garlic - thinly sliced
salt and pepper
Dredge the chicken pieces in the flour that has been seasoned with salt and pepper, knock off any excess flour. On the stove top heat a large skillet on medium high heat. When the pan is hot add the canola oil. When the canola oil is hot carefully place the chicken pieces in the skillet. Let them brown on one side and then turn to brown the other side. Remove chicken from the pan. If there are any BLACK pieces (brown pieces are good) wipe them from the pan. Add the wine and deglaze the pan. Turn the heat down to medium heat. Add the onions and cook until they are translucent - about 5 minutes. Add the garlic and cook for 1 minute more. Add the tomatoes, oregano, bay leaf and chicken and cook for 60 minutes, uncovered, at a low simmer. After 40 minutes add the green garlic. If it boils turn the heat down. After 60 minutes add the cooked beans. Cook for 5 minutes more. Remove the bay leaf.
For individual plating: Put a small portion of the cabbage in the middle of the plate, place a piece of the chicken, then spoon the tomato sauce on and around the plate. Enjoy.
Note: The beans were great in this dish. I have made this many times in the past for the crew without the beans or the green garlic.
 Pound
Pound
Cake with Blue-
berries and Sugar River Dairy Vanilla Yogurt
adapted from The Joy of Cooking
2 cups sifted flour (the original recipe called for cake flour, I used bread flour and
it turned out fine, so your choice - use what you have)
5 large eggs
1 t. vanilla
1/2 t. almond extract
1 t. grated lemon zest
1 t. grated orange zest
1/2 pound (2 sticks) unsalted butter
1 1/3 cups sugar
1/4 t. salt
2 cups fresh or frozen blueberries
1/3 cup sugar
1 T. orange or lemon zest
1 cup Sugar River Dairy Vanilla Yogurt (or other vanilla yogurt of your choosing)
Preheat oven to 325 degrees. Grease and flour on 9 x 5-inch loaf pan or line the bottom with wax or parchment paper
Whisk together in a medium bowl: eggs, vanilla, almond extract, zests. Beat butter in a large bowl until creamy. Gradually add sugar and salt to the butter. Scrape the side of the bowl and beat on high speed until lightened in color and texture, about 3-5 minutes. Gradually dribble in the egg mixture about 1 T. at a time, and beat until light and fluffy, 3-4 minutes. Add the flour in 3 parts, beating on low speed until smooth and scraping the sides of the bowl as necessary. Scrape the batter into the pan and spread evenly. Bake until a toothpick inserted into the middle comes out clean, 1 hour - 1 hour 10 minutes. Let cool in the pan on a rack for 10 minutes. Slide a knife around the cake to detach it from the pan. Invert the cake and peel off the paper liner, if using. Let cool right side up on the rack.
While the cake is baking stir together the blueberries, sugar and zest. Set aside.
Slice the pound cake in 1/2 inch slices. Place a slice or two on a place. Place a couple of spoonfuls of vanilla yogurt on top of the cake and top with a few spoonfuls of the berries. Enjoy.
 Roasted chickens are a common staple in my cooking on the farm - I prepare them a lot. So there will be a lot in the future on this subject. I will repeat over-and-over again how fabulous these chicken are, so I make them for selfish reasons as well as good nourishment for the crew. YUM!!! I have roasted so many chicken over the years (all of them JenEhr's) and I have tried many "tricks". Everyone that I meet has a different way - which has been claimed by the owner as "the best". I have found a way that works for me - a very simple way. I have a two-year-old, so I do not have the luxury of checking in on my bird every 15 minutes. So, I like to turn on the oven and let it go. Also, the less mess the better. And, I have found that cooking at temperatures higher than 375 degrees leaves me with a pan that needs hours/days of soaking. And now to the bondage of the bird - to truss or not to truss. To truss means binding its legs and wings to the body. I perform a "simple" truss on all my chickens - it cooks evenly.
 For this menu I have used cabbage, rutabaga and apples that have survived the winter by cold storing. The cabbage (pictured right, the cabbage on the left has had a few layers removed) looked very scary. It looks rotten on the outside. But, just peel back a few layers and a beautiful cabbage makes its appearance. As for the rutabaga - they are looking a little for the wear and somewhat soft to the touch. I cut off each end, peel them, cut them into "french-fry" sized pieces and soaked them in water. After about 15 minutes that were hard to the touch. Voila!! The apples are from Future Fruit Farm, a CSA that I belonged to in the fall. Ellen and her family grow heirloom apples, crab apples (my favorite), plums and pears. I am big fan of these delicate offerings. I originally signed up because I wanted to feed my son organic apples after I learned that they are #2 in the "dirty dozen". The "dirty dozen" are the top 12 fruits/vegetable that consistently have the highest pesticide contamination. I didn't want him to be consuming pesticides. But, I will save this topic for another day, on to the task at hand, the apples.... I have been successful at storing my apples in my crisper throughout the winter. I am down to a few, so I brought them along to make the apple dessert. I usually make this in the fall when apples are abundant. Plus, the "spice" is great on an crisp fall day. So, you will see this repeated then. I decided this time to add the maple syrup to the icing - apples and maple syrup are two flavors that go together well.


